Enabling and disabling the USB Debugging option is available in every android phones. But some devices, it will be disabled due to some safety measures. To be very frank, Google developed the USB debugging option only for the developers. They can use this option if they want to test their newly created android app on their phone. So, it is generally disabled. The disabling option prevent the non-developers from the risk of enabling it accidentally. That’s why in the latest Android versions, you can find this option under the “Developer Options“.
How To Enable USB Debugging Mode?
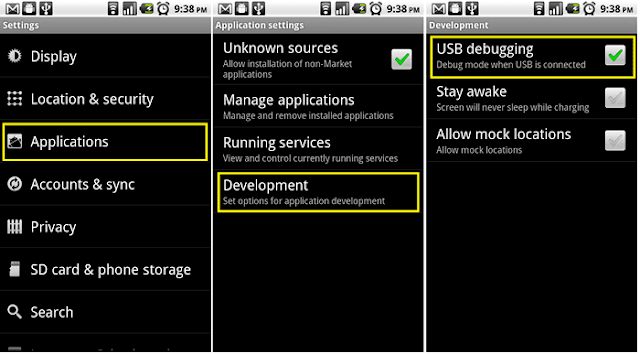
As I have already said, by default this option is generally disabled and hidden. Therefore, if you want to enable the USB Debugging option you need to follow the instructions given below. I have given separate instructions for Android 2.3, 4.0 and 4.2 versions.Enable USB Debugging In Android 2.3 Or Earlier Version:
1.First go to “Settings“.
2.Their tap on the “Applications” option.
3.From there go to “Development“.
4.Now, you need to check the (tick) “USB Debugging” to enable it.
Enable USB Debugging In Android 4.0 Or Higher Version:
1.Google has slightly changed this option on Android 4.0 version compared to the previous versions.2.From the main menu, first go to the “Settings” in your android phone.
3.Scrolling down, you will be able to find the “Developer options“.
4.Tap that option now and you can see the “USB Debugging” option. Just enable it by taping on it.
Enable USB Debugging Mode In Android 4.2 Or Latest Versions (4.4, 5.0, etc):
1.In this version, Google has hidden the whole “Developer options” section for the users who are not much familiar to use developing tools.
2.So, to enable it go to “Settings” option.
3.From Settings go to “About” option.
4.From there go the “Build number“. You can find this at the end of the scroll.
5.Just tap that Build Number option repeatedly for 7 times. On the third tap, you will be presented with a message saying you have only 4 more taps to be a developer.
6.Continue to tap until you the message “Hooray, you are now a Developer“. At this phase, go back to the “Settings” page.
7.Now, you will be able to see the “Developer options“.
8.Launch the developer options, then check the “USB Debugging” option. Tap “OK“.
Once this option is enabled, even as a non-developer you can access this option over your device and you will get full freedom to control your android phone. There after you can easily root or update your android smartphone by following the appropriate procedure. Enjoy!


0 comments:
Post a Comment
Please drop a comment